Daytona has introduced a powerful new provider that enables developers to seamlessly create and manage workspace projects using Fly.io's virtual machines (Fly Machines).
This integration bridges the gap between local development and cloud deployment, offering developers a streamlined workflow for managing cloud resources.
What is the Fly Provider?
The Fly Provider is an integration that connects Daytona with Fly.io's global network of low-latency edge servers. This powerful combination offers several key benefits:
Global Deployment: Deploy workspaces to any of Fly.io's worldwide locations
Edge Computing: Leverage Fly.io's distributed infrastructure for better performance
Simplified Management: Manage your cloud resources through Daytona’s familiar interface
Cost-Effective: Pay only for the resources you use with Fly.io's usage-based pricing
Developer-Friendly: Maintain your existing workflow while gaining cloud capabilities
Prerequisites
Before starting, ensure you have:
The latest version of Daytona installed on your system (Installation Guide)
An active Fly.io account with API access
The Fly CLI installed (Installation Guide)
Basic familiarity with command-line operations
Sufficient permissions to create and manage Fly Machines
Installation and Setup
1. Installing the Fly Provider
Start by installing the Fly Provider using the Daytona CLI:
1daytona provider install
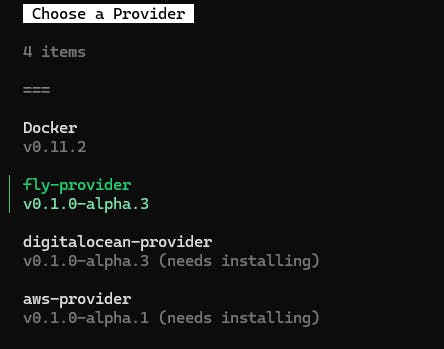
You’ll see a list of available providers. Use the arrow keys to select fly-provider:
After selection, you’ll see a confirmation that the provider was installed successfully:

2. Provider Configuration
The configuration process involves several steps to set up your Fly.io integration.
Step 1: Initialize Target Setup
Run the following command to begin target configuration:
1daytona target set
Step 2: Create New Target
Select “New Target” from the list to create a fresh configuration:
Step 3: Name Your Target
Enter a meaningful name for your target configuration:
Step 4: Configure Fly.io Details
Enter your Fly.io configuration details when prompted. You’ll need to provide:
Organization Name
API token
Default region (optional)

Step 5: Verify your target with
1daytona target list
3. Creating Your First Workspace
The workspace creation process has been updated with new options and flexibility. Use the following command structure:
1daytona create [REPOSITORY_URL | PROJECT_CONFIG_NAME] [flags]
Basic Workspace Creation Options
You can create workspaces in several ways:
From a Git Repository:
1daytona create https://github.com/daytonaio/content --name workspacename
With Custom Image:
1daytona create https://github.com/daytonaio/content --custom-image ubuntu:latest --custom-image-user ubuntu --name workspacename
Managing Workspaces
Basic Operations:
Listing Workspaces
1daytona list
Stopping a Workspace
1daytona stop <workspace-name>
Starting a Workspace
1daytona start <workspace-name>
Deleting a Workspace
1daytona delete <workspace-name>
Best Practices
Resource Management
Monitor your resource usage regularly
Start with smaller instances and scale up as needed
Clean up unused workspaces promptly
Use appropriate machine sizes for your workload
Consider regional pricing differences
Security
Rotate your API keys periodically
Use minimal required permissions for your API tokens
Keep your Fly CLI and Daytona installations updated
Implement proper access controls
Regularly audit your workspace configurations
Performance Optimization
Choose regions closest to your team
Use appropriate machine sizes
Monitor resource utilization
Implement caching when possible
Regular maintenance and updates
Troubleshooting Guide
Authentication Issues
Problem: API authentication failures
Solution:
Verify your API key’s validity
Check API key permissions
Ensure your Fly.io account is active
Validate your authentication configuration
Check for any account billing issues
Deployment Failures
When a workspace fails to deploy, follow these troubleshooting steps: check resource allocation for sufficient capacity, verify active account status, review deployment logs for error messages, confirm compatible region selection, validate network configurations, and check for conflicting workspace names.
Network Issues
Problem: Connectivity problems
Solution:
Check Fly.io status page
Verify network configurations
Test regional connectivity
Review firewall settings
Validate DNS configurations
Conclusion
The Fly Provider enables developers to leverage Fly.io's global infrastructure through Daytona’s familiar interface. While the integration continues to evolve, it provides a solid foundation for cloud-native development workflows. For updates and new features, check the Daytona blog and GitHub repository.